
How to Use Aspire Spryte Starter Kit - User Manual
Read this information leaflet fully before you start using this product as it contains important information. The notes below relate to when the device is filled with e-liquid that contains nicotine.
This product is intended for adult smokers. This product is not recommended for non-smokers, young people under the age of 18 years, pregnant or breast feeding women and those experiencing general ill health.
2* Extra O rings
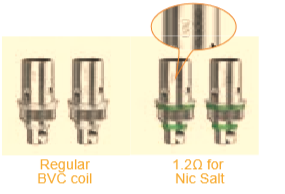
2* Coils (1*1.8Ω & 1*1.2Ω for
Nic Salt)
1* Silicone seal
1* Micro USB Cable
1* Warranty Card
1* User Manual
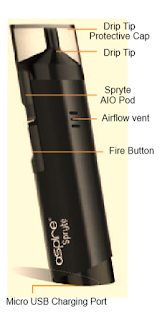
• Spryte AIO Pod capacity: 3.5ml
• Spryte AIO coil is interchangeable with original CE5 BVC coils
• Built-in Battery Capacity: 650mAh
• Dimensions: 108*26*26mm
• Adjustable airflow
• Coil resistance:1.8ohm
• Coil type: Nichrome
• Easy bottom fill
• Output wattage:12W

1. Pull and remove the pod from the main body of the Spryte AIO.
2. Invert the pod and lift the silicon seal.
3. Place the filling bottle/dropper into the pod filling hole.
4. Squeeze the filling bottle/dropper bulb to add your preferred e-liquid into the pod system
5. Replace the silicone seal firmly.
6. Re-inset the pod into the power unit, and push down firmly until it 'clicks' into place.
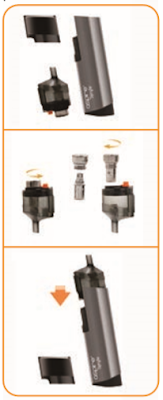
1. Pull and remove the pod from the main body of the Spryte AIO.
2. Invert the pod then unscrew and pull out the chimney unit.
3. Detach the atomizer from the airflow control ring and replace it with a new one.
4. Screw the chimney unit back to the pod system
5. Re-insert the pod into the power unit, and push down firmly until it 'clicks' into place.
Note: To adjust the airflow of the Spryte AIO, please remove the pod and rotate the airflow control ring on bottom of the Spryte AIO pod.
Pressing the fire button five times within two seconds will turn the device on or off. The indicator lights will flash blue and red three times to indicate off or on.
When the Spryte AIO is on, press the fire button the lights will indicate your Spryte AIO's current charge. When its current charge capacity is above 3.8 volts the indicator lights will be blue and red. When the charge is between 3.8 and 3.5 volts the lights will be blue only. When the charge drops below 3.5 volts the lights will then become red to remind you that it is time to charge your Spryte AIO.
• Automatic Cutoff: The preset continuous fire time is 15 seconds, after 15 seconds of continuous firing, the LED lights will flash blue and red 10 times and the Spryte AIO will stop firing, it will fire again when the button is pressed.
• Short Circuit Protection: When the Spryte AIO detects a short, it will stop firing, and the LED lights will flash blue and red 3 times .
• Low Voltage Protection: When the battery level drops below 3.2V, the Spryte AIO will not function and the LED lights will flash red 15 times.
• Overcharge Protection: When the Spryte AIO is fully charged, it will stop charging to prevent overcharging of your battery.
• Over heat protection: When the temperature of the control board is above 75 OC/167 OF, will on blue and red for 3 seconds to remind overheat and the Spryte AIO will cut off.
• When the USB cable is attached the Spryte AIO indicator lights will flash blue and red three times. While charging the LED will indicate the Spryte’s current charge status: 3.5 volts or less= red light; 3.5 to 3.8 volts= blue light; 3.8 volts and above =both blue and red lights. When the Spryte AIO is fully charged the LED will flash blue and red 20 times then remain off.
This product is intended for adult smokers. This product is not recommended for non-smokers, young people under the age of 18 years, pregnant or breast feeding women and those experiencing general ill health.

Contents:
1* Spryte device2* Extra O rings
2* Coils (1*1.8Ω & 1*1.2Ω for
Nic Salt)
1* Silicone seal
1* Micro USB Cable
1* Warranty Card
1* User Manual
Specifications
• Spryte AIO Pod capacity: 3.5ml
• Spryte AIO coil is interchangeable with original CE5 BVC coils
• Built-in Battery Capacity: 650mAh
• Dimensions: 108*26*26mm
• Adjustable airflow
• Coil resistance:1.8ohm
• Coil type: Nichrome
• Easy bottom fill
• Output wattage:12W
Spryte AIO Filling

1. Pull and remove the pod from the main body of the Spryte AIO.
2. Invert the pod and lift the silicon seal.
3. Place the filling bottle/dropper into the pod filling hole.
4. Squeeze the filling bottle/dropper bulb to add your preferred e-liquid into the pod system
5. Replace the silicone seal firmly.
6. Re-inset the pod into the power unit, and push down firmly until it 'clicks' into place.
Spryte AIO Coil Installation
1. Pull and remove the pod from the main body of the Spryte AIO.
2. Invert the pod then unscrew and pull out the chimney unit.
3. Detach the atomizer from the airflow control ring and replace it with a new one.
4. Screw the chimney unit back to the pod system
5. Re-insert the pod into the power unit, and push down firmly until it 'clicks' into place.
Note: To adjust the airflow of the Spryte AIO, please remove the pod and rotate the airflow control ring on bottom of the Spryte AIO pod.
Instructions
Pressing the fire button five times within two seconds will turn the device on or off. The indicator lights will flash blue and red three times to indicate off or on.
When the Spryte AIO is on, press the fire button the lights will indicate your Spryte AIO's current charge. When its current charge capacity is above 3.8 volts the indicator lights will be blue and red. When the charge is between 3.8 and 3.5 volts the lights will be blue only. When the charge drops below 3.5 volts the lights will then become red to remind you that it is time to charge your Spryte AIO.
Protective Features
• Automatic Cutoff: The preset continuous fire time is 15 seconds, after 15 seconds of continuous firing, the LED lights will flash blue and red 10 times and the Spryte AIO will stop firing, it will fire again when the button is pressed.• Short Circuit Protection: When the Spryte AIO detects a short, it will stop firing, and the LED lights will flash blue and red 3 times .
• Low Voltage Protection: When the battery level drops below 3.2V, the Spryte AIO will not function and the LED lights will flash red 15 times.
• Overcharge Protection: When the Spryte AIO is fully charged, it will stop charging to prevent overcharging of your battery.
• Over heat protection: When the temperature of the control board is above 75 OC/167 OF, will on blue and red for 3 seconds to remind overheat and the Spryte AIO will cut off.
Charging Instructions
• Charge via the Micro USB port. Maximum charge current can reach up to 1000mA.• When the USB cable is attached the Spryte AIO indicator lights will flash blue and red three times. While charging the LED will indicate the Spryte’s current charge status: 3.5 volts or less= red light; 3.5 to 3.8 volts= blue light; 3.8 volts and above =both blue and red lights. When the Spryte AIO is fully charged the LED will flash blue and red 20 times then remain off.


No comments